Installing a wall lamp can instantly enhance the ambiance of any room. However, many people hesitate to make holes in their walls. This is where the question arises: how to install a wall lamp without drilling. Thankfully, there are effective methods available that require no tools and minimal effort.
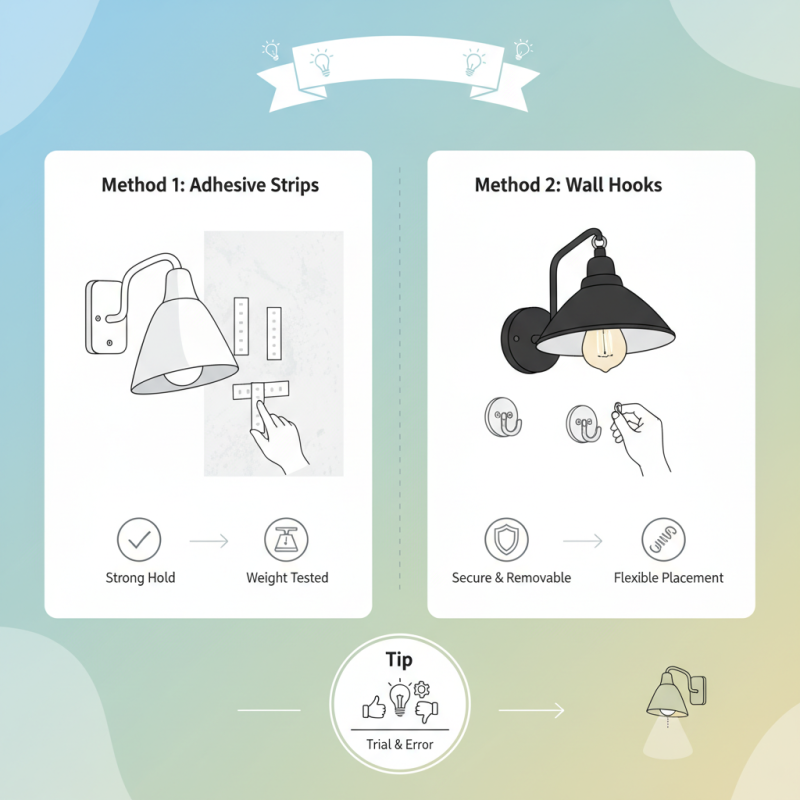
You can use adhesive mounting strips or wall hooks to hang your lamp securely. These options provide flexibility and save time. They also avoid the potential damage that drilling can cause. But, it's essential to choose high-quality adhesives for best results. Some people experience issues with peeling or weight capacity. It’s a learning curve to find the right fit for your lamp.
Exploring different techniques helps ensure safety and reliability. Not every lamp is suitable for adhesive installation. Testing weights and surfaces can be crucial. Embracing trial and error will lead you to the best solution for your needs. Installing a wall lamp without drilling is an achievable task, with the right approach and patience.
Choosing the right wall lamp for a no-drill installation is essential for both functionality and aesthetics. Many homeowners seek easy alternatives to traditional mounting methods. A study found that over 30% of renters avoid drilling holes in walls to maintain their deposits. Therefore, delighting in wall lamps that don't require drilling is popular. Look for options with adhesive backings or those designed with brackets that can support their weight effectively.
When selecting a wall lamp, consider the type of adhesive used. Heavy-duty adhesives can support various designs while ensuring durability. Moreover, lighting that can adjust brightness or color temperature adds versatility to your space. Industry data emphasizes that adjustable lighting enhances mood and productivity.
Tips: Measure the wall space before installation. Assess the lamp's weight and the adhesive's load capacity. Consider the room's purpose when choosing brightness levels. A cozy ambiance is essential for living areas, while bright, focused light works well in home offices. Finding the right balance can create both comfort and functionality. Always review user feedback for real-world performance insights on specific wall lamp models.
Installing a wall lamp without drilling can seem daunting. However, adhesive hooks and strips offer a practical solution. These products provide a simple and damage-free installation method. They are particularly useful for renters or those who frequently change decor.
When using adhesive hooks, ensure the wall surface is clean and dry. Consider the weight of your lamp. Some hooks support heavier items, while others are suitable for lighter fixtures. Always read the weight guidelines. Improper use may lead to the lamp falling or damaging the wall.
Adhesive strips can be an alternative to hooks. They are effective for flat surfaces and provide a sleek appearance. However, placement is crucial. A misaligned strip could ruin the aesthetic. Periodic checks are necessary, as humidity or temperature changes can affect adhesion. Assessing the installation’s reliability ensures safety and longevity for your wall lamp.
| Solution Type | Weight Capacity | Surface Compatibility | Ease of Use | Removability |
|---|---|---|---|---|
| Adhesive Hooks | Up to 5 lbs | Painted Walls, Tiles | Very Easy | Easy to Remove |
| Adhesive Strips | Up to 10 lbs | Wood, Glass | Very Easy | Damage-Free Removal |
| Velcro Strips | Up to 7 lbs | Drywall, Metal | Easy | Repositionable |
| Nano Tape | Up to 10 lbs | Almost Any Surface | Moderately Easy | Washable and Reusable |
When preparing the wall surface for adhesive application, cleanliness is crucial. Dust, grease, or moisture can prevent proper adhesion. According to a recent study from the Home Improvement Research Institute, ensuring a clean surface can increase the bond strength of adhesives by up to 40%. This significant improvement emphasizes the importance of thorough preparation.
Start by wiping the area with a damp cloth. Allow it to dry completely. If the wall is painted, consider light sanding for better adhesion. A report from The Adhesive and Sealant Council states that roughening the surface can enhance mechanical bonding, making it more secure. The optimal temperature for adhesive application is between 65°F and 75°F. Adhesives often fail in extreme conditions.
Using the correct adhesive is essential. Some may not perform well on textured surfaces or in humid environments. Not all surfaces are equal, and misjudging the material type leads to poor results. A failed application can be frustrating and requires additional effort to rectify. Ensuring you follow these preparation steps could save time and resources in the long run.
Mounting a wall lamp without drilling can seem daunting. However, with the right approach, it becomes manageable. Start by selecting a wall lamp that is not too heavy. Light fixtures with adhesive mounting options are ideal. They come with strong backing that allows for secure placement.
Clean the wall thoroughly where you want to install the lamp. Dust and grease can weaken the adhesive. After cleaning, mark the desired height and position. Taking time to measure ensures you avoid mistakes. Align the lamp with your markings, and press firmly. Hold it for the recommended time on the instructions. This helps the adhesive to bond well.
Consider that not all walls are the same. Textured surfaces may require different techniques. If the lamp falls, it may damage the wall or lamp. Keep an eye on how well the bond holds over time. You might need to readjust or replace adhesive strips. This can be frustrating but is often part of the process.
Installing a wall lamp without drilling can be a simple task with the right approach. When it comes to adhesive bonds, ensuring longevity is key. Start by cleaning the surface thoroughly. Dust, grease, or moisture can weaken adhesion. Use a solution with isopropyl alcohol to remove residues. This step is crucial.
Select the right adhesive strips or mounting tape for the surface type. Some surfaces, like painted walls, may not bond as well as others. Testing a small area first can reveal weaknesses. It's also wise to apply pressure; this helps set the bond. A few seconds of firm pressure can make a difference.
Consider environmental factors. Humidity and temperature changes can affect adhesive lifespan. If you live in a humid area, look for moisture-resistant strips. Reflect on the placement of your lamp; is it easily accessible for future adjustments? Careful planning can save time and frustration later.
: Clean surfaces increase bond strength by up to 40%. Dust, grease, or moisture can prevent adhesion.
Start by cleaning the wall with a damp cloth. Allow it to dry completely before proceeding.
Yes, light sanding can improve adhesion, especially on painted surfaces. It enhances mechanical bonding.
The best temperature range is between 65°F and 75°F. Extreme conditions can cause adhesive failure.
Choose a lightweight lamp and clean the wall thoroughly. Press firmly after aligning it with the markings.
Yes, textured surfaces may require different techniques for effective bonding. Adjust your approach accordingly.
If it falls, assess the damage and check the adhesive bond. You may need to readjust or replace adhesive strips.
High humidity can weaken adhesion over time. Using moisture-resistant strips is advisable in humid areas.
Yes, testing a small area can reveal weaknesses in bond strength. It's a proactive approach to avoid failures.
Ensure the lamp placement allows easy access for future adjustments. Planning helps reduce frustration later.
This article provides a comprehensive guide on how to install a wall lamp without drilling, making it accessible for those who prefer to avoid wall damage or complex tools. It begins with tips on choosing the right wall lamp designed for no-drill installation, ensuring an aesthetically pleasing and functional choice.
The article then delves into the use of adhesive hooks and strips as effective installation solutions, along with essential preparation steps for the wall surface to enhance adhesive longevity. A detailed step-by-step guide follows, outlining the process to mount the lamp securely. Finally, the article offers practical tips to ensure a long-lasting adhesive bond on various surfaces, empowering readers to achieve a successful installation without the need for drilling.
Silvan Lighting