Lighting coordination is no longer only a decoration task. It affects comfort, visibility, energy use, and the perceived size of a room. The U.S. Department of Energy reports that residential LED bulbs use at least 75% less energy than incandescent bulbs and can last up to 25 times longer. This efficiency matters, but matching every fixture with the same lamp is not the answer. Different layers need different jobs.
This guide explores how to coordinate different lighting fixtures in one room without creating glare or visual noise. Ambient lighting can establish a soft foundation, while task lighting should place focused brightness over a desk, island, or reading chair. Accent fixtures can then highlight artwork, shelving, or textured walls. The Illuminating Engineering Society emphasizes that lighting quality depends on distribution, contrast, glare control, and the activity being performed. A beautiful pendant may still cast harsh shadows.
Color temperature, beam angle, scale, and finish also require practical judgment. For example, a 2700K floor lamp may feel welcoming beside a sofa, while a brighter 3000K downlight may support food preparation. However, the difference can feel accidental if both sources remain visible at once. Start with a lighting plan.
Real rooms rarely behave like diagrams. Wall colors reflect light differently, and glossy surfaces can expose mistakes. Even experienced designers revise fixture positions after testing the space at night. The following ten methods combine energy-conscious planning, visual balance, and hands-on observation. They offer a reliable framework, though not a rigid formula, for creating rooms that feel intentional rather than overdesigned.
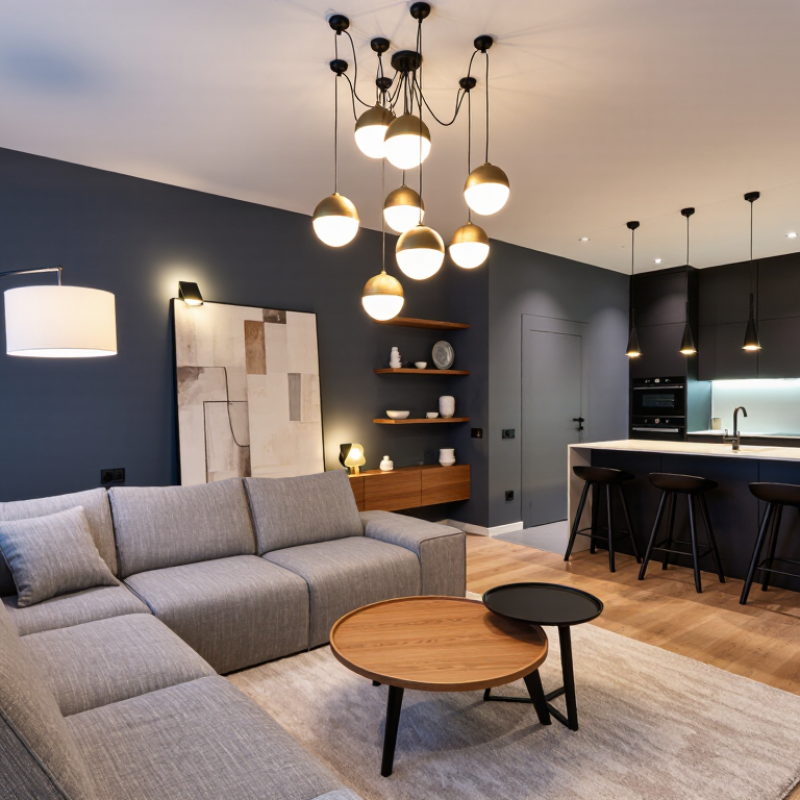
Top 10 Ways to Coordinate Different Lighting Fixtures
Map the Room’s Lighting Needs Before Choosing Fixtures
A lighting plan should begin with activities, not attractive fixtures. Sketch the room, then mark reading, cooking, grooming, circulation, and display zones. The U.S. Energy Information Administration’s Commercial Buildings Energy Consumption Survey reports that lighting uses about 17% of commercial-building electricity. Poor placement wastes energy and creates glare. Measure the room’s length, ceiling height, window positions, and darker corners before shopping.
Divide the plan into ten practical layers: ambient, task, accent, decorative, wall washing, ceiling lighting, floor lighting, daylight control, dimming, and color consistency. Use the Illuminating Engineering Society’s recommended illuminance guidance for each activity. A desk needs focused light, while a hallway needs safe, even coverage. Coordinate beam angles, mounting heights, color temperature, and dimming ranges. Keep warm and cool sources from fighting across one sightline. It looks small on paper.
The International Energy Agency notes that lighting represents roughly 15% of global electricity consumption, making control choices important. Put frequently used fixtures on separate circuits. Use occupancy or daylight controls where movement and sunlight change often. Select compatible drivers and dimmers, then test them together before installation. I still make one mistake: I judge brightness from a catalog image. Real surfaces, paint colors, shadows, and eye level can change the result. A cardboard mock-up and an evening test reveal problems earlier.
Coordinating ten lighting fixtures does not mean making them identical.
It means repeating visual cues across the room. Start with a shared silhouette, such as soft globes, narrow cylinders, or clean arches. Then connect finishes, including aged brass, matte black, brushed steel, or warm white paint. Use one dominant material and one supporting accent. Too many finishes create noise. I learned this after pairing three metals in a dining room; the ceiling felt busier than the table.
Coordinate shape, finish, scale, shade texture, and light color. Keep larger fixtures near major furniture, while smaller fittings can guide movement through hallways. A linen pendant can echo a linen wall sconce without matching its exact shape. Glass shades add brightness, but they may expose messy bulbs and wiring. Check those details from eye level. They matter.
Material transitions should feel intentional. For example, dark metal on a kitchen pendant can reappear as a small detail on nearby cabinet lighting. Warm light usually supports wood, plaster, and natural fabrics better than a cold white tone. Still, consistency has limits. A room with identical fixtures may feel carefully arranged but strangely flat. I sometimes leave one fixture slightly different, then remove it if the contrast lacks purpose. Test samples at night, not only under showroom lighting. Human comfort should guide the final choice.
Top 10 Ways to Coordinate Different Lighting Fixtures
Layering ambient, task, accent, and decorative lighting creates a room that feels useful and welcoming. Start with ambient fixtures, such as ceiling lights or wall-mounted sources, to establish soft overall brightness. Keep the light even, but not flat. A dimmer helps adjust the mood from daytime work to evening rest.
Add task lighting where activities happen. Place a focused fixture beside a reading chair, above a preparation surface, or near a desk. Avoid placing strong light directly behind your head. It can cast shadows onto your work. Accent lighting can then highlight artwork, textured walls, shelves, or plants. Aim the beam carefully. Too much glare quickly feels uncomfortable. I often test the angle after sunset because daytime impressions can be misleading.
Decorative fixtures contribute shape, warmth, and visual rhythm. Coordinate their color temperature, finish, and scale without making every piece identical. Repeating one metal tone can connect separate areas. Combining warm ambient light with slightly brighter task light usually feels natural, though personal comfort matters more than a strict rule. Use separate controls when possible. This lets each layer work independently. Keep cables concealed and maintain safe clearances around heat-producing fixtures. I still sometimes choose a fixture that looks excellent but performs poorly. That mistake is useful; appearance should never replace function. Walk through the room from several viewpoints before fixing anything permanently. Notice dark corners, reflections on screens, and shadows across faces. Small adjustments often improve the entire arrangement.
| No. | Coordination Method | Lighting Layers | Recommended Fixtures | Placement and Application | Typical Color Temperature | Control Strategy | Expected Lighting Effect |
|---|---|---|---|---|---|---|---|
| 1 | Establish a balanced ambient base | Ambient | Ceiling-mounted fixtures, recessed downlights, flush mounts, or evenly spaced linear lights | Distribute fixtures across the room to reduce dark zones and provide comfortable general visibility. | 2700–3500 K for residential areas; 3500–4000 K for work-oriented spaces | Use one central circuit or divide the room into practical lighting zones. | Creates a consistent brightness level that supports movement and orientation. |
| 2 | Add task lighting where activities occur | Task Ambient | Under-cabinet lights, desk lamps, reading lamps, vanity lights, or adjustable spotlights | Place the light close to work surfaces while minimizing shadows from the user’s head or hands. | 3000–4000 K; higher values can improve visual clarity in detailed work areas. | Use independent switching or dimming so task areas can be brighter than the surrounding room. | Improves visibility for cooking, reading, grooming, studying, and other precise activities. |
| 3 | Highlight architectural features | Accent Ambient | Adjustable recessed spotlights, track heads, wall washers, or narrow-beam projectors | Aim fixtures toward textured walls, built-in shelving, artwork, fireplaces, or architectural details. | 2700–3500 K to create a warm and visually comfortable focal point. | Connect accent fixtures to a separate scene or dimming circuit. | Adds depth, contrast, and visual hierarchy without increasing overall room brightness excessively. |
| 4 | Use decorative fixtures as visual anchors | Decorative Ambient | Pendants, chandeliers, sculptural ceiling fixtures, or statement wall sconces | Center the fixture over dining tables, islands, seating groups, or other important spatial features. | 2700–3000 K for a welcoming and intimate appearance. | Provide a dimmer and select a fixture with suitable downward or diffused light distribution. | Combines illumination with a strong design element and defines the character of the space. |
| 5 | Coordinate fixture beam angles | Accent Task | Adjustable spotlights, recessed gimbal lights, and track-mounted fixtures | Use wider beams for broad surfaces and narrower beams for artwork, objects, or concentrated task areas. | 2700–3500 K, matched across fixtures to maintain visual consistency. | Group fixtures by purpose rather than placing every fixture on one switch. | Reduces glare and creates intentional pools of light instead of uneven brightness. |
| 6 | Layer wall lighting for depth | Ambient Accent Decorative | Wall sconces, concealed linear lighting, cove lighting, or vertical wall washers | Install on walls, within recesses, or above ceilings to illuminate surfaces indirectly. | 2700–3500 K for soft wall brightness and reduced visual harshness. | Operate wall lighting separately from overhead fixtures and reduce its output in bright conditions. | Makes rooms appear more spacious while softening shadows and improving perceived comfort. |
| 7 | Match light levels between adjacent areas | Ambient Task | Ceiling fixtures, pendants, floor lamps, and corridor or transition lighting | Coordinate brightness between connected rooms, hallways, kitchens, dining areas, and living spaces. | Use similar color temperatures, generally within a 300–500 K range between connected zones. | Use linked scenes or nearby controls to prevent abrupt changes in brightness. | Improves visual comfort and creates a coherent experience throughout an open-plan layout. |
| 8 | Use dimming to adapt the atmosphere | Ambient Task Accent Decorative | Dimmable LED downlights, pendants, wall lights, lamps, and accent fixtures | Set brighter levels for cleaning or detailed work and lower levels for relaxation, dining, or evening use. | 2700–4000 K depending on the room and activity; keep the selected temperature consistent within each scene. | Create practical scenes such as “Day,” “Work,” “Relax,” and “Entertain.” | Allows one lighting arrangement to support different activities and times of day. |
| 9 | Combine direct and indirect light | Ambient Accent | Direct downlights paired with cove lighting, uplights, backlighting, or concealed strips | Use direct light for functional areas and indirect light on ceilings, walls, or behind architectural elements. | 2700–3500 K for a balanced and comfortable visual environment. | Control direct and indirect sources independently to adjust contrast and mood. | Provides functional illumination while reducing harsh shadows and excessive contrast. |
| 10 | Coordinate scale, spacing, and visual rhythm | Decorative Ambient Accent | Matching or complementary pendants, sconces, recessed lights, floor lamps, and table lamps | Align fixtures with furniture, architectural axes, circulation paths, and ceiling proportions. | 2700–3500 K in most residential and hospitality-style environments. | Use consistent finishes, repeated spacing, and coordinated control zones rather than identical fixtures everywhere. | Creates a visually organized composition in which each fixture supports the room’s function and design. |
Coordinating different lighting fixtures starts with color temperature.
In residential rooms, I often begin with 2700K to create a warm, comfortable atmosphere. A nearby 3000K fixture can work, but only when its purpose is clear. Otherwise, the room may feel visually divided. Test samples after sunset, not only under daylight. Small shifts matter.
Brightness needs a practical hierarchy. Use brighter task lighting above a kitchen island or reading chair. Keep ambient fixtures softer and evenly distributed. Dimmers help, although they cannot fix poor fixture placement. I once installed a beautiful pendant too far from the table. The light looked attractive but felt inconvenient during meals. Measure the activity zone before choosing the fixture.
Scale should relate to the room and nearby furniture. A large pendant may suit a high ceiling, while a narrow hallway needs a lighter visual form. Fixture placement should guide movement without creating glare on screens, mirrors, or polished surfaces. Leave enough distance between overlapping beams. In my experience, matching every fixture is less effective than repeating one detail, such as a finish or shape. Still, I sometimes over-coordinate spaces. A little contrast can make the lighting feel more natural.
A coordinated lighting scheme begins with the room’s purpose, not with fixture appearance. Map work areas, walking routes, seating zones, and visual focal points before selecting products. A kitchen may need bright, shadow-free task lighting, while a dining corner benefits from a lower, warmer glow. This functional map prevents attractive fixtures from creating uncomfortable glare.
Use a shared visual language through shape, finish, beam spread, and light color. Recessed lights can provide quiet background illumination, while pendants or wall fixtures add scale and character. Keep their color temperature consistent unless a deliberate contrast supports the space. Dimmer controls also help the room shift from practical to relaxed without changing fixtures. Test light at night. Daylight can hide poor distribution.
Visual rhythm comes from spacing and repetition. Align downlights with cabinet edges, repeat pendant spacing above a long table, and echo vertical fixtures along a corridor. Avoid placing every light on one central axis; that often makes the ceiling feel mechanical. I still get this wrong when symmetry becomes more important than furniture placement. Leave room for adjustment. Mock up fixture positions with paper templates, then inspect shadows on walls, artwork, and faces. A reliable scheme balances measured illumination with lived experience, but personal comfort can expose flaws that calculations miss.
Start with activities, not attractive fixtures. Sketch reading, cooking, grooming, walking, and display areas. Measure ceiling height, windows, and darker corners.
Consider ambient, task, accent, and decorative lighting. Wall washing, ceiling lighting, floor lighting, daylight control, dimming, and color consistency may also help. Use only the layers the room needs.
Place focused light beside a reading chair, above a preparation surface, or near a desk. Avoid positioning it directly behind your head. Shadows may cover the work area.
Aim beams carefully and inspect screens, glossy surfaces, artwork, and faces. Test the room after sunset. Daylight can hide glare problems.
Usually, consistent color temperature creates a calmer appearance. A warmer background light with a slightly brighter task light can feel natural. Personal comfort still matters more than strict rules.
Separate controls let ambient, task, accent, and decorative layers work independently. A dimmer can support daytime work and evening relaxation. Test drivers and dimmers together before installation.
Align downlights with cabinet edges and space pendants evenly above a table. Repeat vertical fixtures along a corridor. Avoid placing every light on one central axis.
Use cardboard or paper templates to mark fixture positions. Walk through the room from several viewpoints. Check shadows, dark corners, reflections, and eye-level brightness.
Do not trust a catalog image alone. Paint, furniture, surface texture, and eye level can change the result. I still choose attractive fixtures that perform poorly sometimes. That mistake teaches me to test earlier.
Coordinating multiple lighting fixtures begins with understanding the room’s purpose, layout, and lighting needs. Before choosing fixtures, identify areas that require general illumination, focused task lighting, visual accents, or decorative highlights. Then create a unified look by connecting fixtures through similar shapes, finishes, materials, or design details while allowing enough variation to keep the room interesting. Learning how to coordinate different lighting fixtures in one room also requires careful attention to color temperature, brightness, scale, and placement. These elements should work together without making the space feel overly bright, dim, crowded, or visually unbalanced.
An effective lighting plan combines ambient, task, accent, and decorative lighting in thoughtful layers. Use brighter, more focused fixtures where activities take place, softer illumination for overall comfort, and accent lighting to emphasize architectural details or selected objects. Finally, review the complete scheme from different viewpoints and at different times of day. A successful arrangement should provide practical illumination, maintain a consistent style, and create a natural visual rhythm throughout the room.
Silvan Lighting